Posted on Leave a comment

Sample Creators: How to Use Buses & Auxiliary Outputs

As of version 1.12.0, Decent Sampler has support for both audio buses and auxiliary outputs. Buses are a powerful feature that allow you to route audio to different auxiliary outputs and apply effects to the audio. This can be useful for creating complex audio routing setups and adding effects to groups of samples. This tutorial will show you how to use buses and auxiliary outputs in Decent Sampler.

Auxilary Outputs

By default, all audio in Decent Sampler is routed to the main audio output. However, you can also route audio to secondary auxiliary outputs. Auxiliary outputs are additional audio outputs that can be used to route audio to external effects processors or other audio devices within your DAW. Decent Sampler supports up to 16 auxiliary stereo outputs, which can be used to create complex audio routing setups.

There are two ways that you can route audio to auxiliary outputs in Decent Sampler:

  1. You can use the outputXTarget attributes in the <sample><group>, or <groups> elements to directly specify the audio output that the sample should be routed to. The available options are MAIN_OUTPUT (the main audio output, which is the default) and AUX_STEREO_OUTPUT_1 through AUX_STEREO_OUTPUT_16 (the auxiliary outputs).
  2. You can also route audio from the samples to user-defined buses, and then route audio from the buses to the auxiliary outputs. This allows you to apply effects to the audio before sending it to the auxiliary outputs. We’ll cover that more below in the Buses section.

Example 1: Routing audio to an auxiliary output

In this example, we will route audio from a sample to an auxiliary output. To do this, we will use the outputXTarget attributes in the <sample> element to specify the audio output that the sample should be routed to. Here is an example of how you can route audio to AUX_STEREO_OUTPUT_1:

<group output1Target="MAIN_OUTPUT" output1Volume="1.0" output2Target="AUX_STEREO_OUTPUT_1" output2Volume="0.5" />
    <!-- Samples go here -->
</group>

In this example, the audio from the samples in the <group> element will be routed to the main audio output with a volume of 1.0, as well as to auxiliary output 1 with a volume of 0.5.

Buses

As mentioned above, buses can be used to create a more complex mix of the samples in the sample library as well as route audio to various audio outputs. Sample library designers can specify up to 16 buses in the <buses> element using the <bus> tag. Each bus can have its own volume and audio output settings. For a full list of attributes that can be used in the <bus> element, see the Buses Element documentation.

Example 2: Applying effects to audio using buses

In this example, we will apply an effect to audio using a bus. To do this, we will define a bus with an effect applied to it, and then route audio from the samples to the bus. Here is an example of how you can apply a reverb effect to audio using a bus:

<buses>
    <bus busVolume="0.5" output1Target="MAIN_OUTPUT" output2Target="AUX_STEREO_OUTPUT_1" output1Volume="0.8" output2Volume="0.5">
        <effects>
            <effect type="Reverb" wetDryMix="0.5" roomSize="0.5" damping="0.5" />
        </effects>
    </bus>
</buses>
<group output1Target="MAIN_OUTPUT" output2Target="BUS_1" output2Volume="1.0">
    <!-- Samples go here -->
</group>

In this example, a bus is defined with a reverb effect applied to it. The audio from the samples in the <group> element will be routed to the main audio output with a volume of 1.0, as well as to the bus with the reverb effect applied to it.

Conclusion

Buses and auxiliary outputs are powerful features in Decent Sampler that allow you to create complex audio routing setups and apply effects to groups of samples. By using buses and auxiliary outputs, you can create more dynamic and interesting sample libraries that take full advantage of Decent Sampler’s capabilities. You can find working examples of both audio outputs and buses in the official Decent Sampler example repository (look in the Example 10 directory).

Have fun!

– Dave Hilowitz

Posted on Leave a comment

Saving User Presets in DecentSampler: A Quick Guide

As a DecentSampler user, you’ve likely spent time tweaking and perfecting your sound. But what if you want to save these settings for future use? Good news! DecentSampler allows you to save user presets for any library you’re currently using. Here’s how to do it:

Step 1: Convert Your Library Format

Before you can save user presets, you need to ensure your library is in the correct format. Specifically, if your library is in a .dslibrary format, you must first convert it to either a .dsbundle or a folder-based preset.

Method 1: Converting .dslibrary files using Decent Sampler

The easiest way to convert a .dslibrary file is by using the DecentSampler plug-in itself:

  1. Simply drag that .dslibrary file onto the DecentSampler plug-in window. 
  2. You will see a box that says Do you want to install this preset?, click Yes.
  3. DecentSampler will decompress the .dslibrary file and create a new .dsbundle directory wherever you keep your sample libraries. For a list of the default sample library locations, see here.

Method 2: Manually Method

If Method 1 doesn’t work for some reason, you can also convert the file yourself. At their core, .dslibrary files are just .zip files with a different extension. 

  1. Change the extension on the .dslibrary file to .zip.
  2. Decompress the .zip file and put it wherever you store your sample libraries. If you are on macOS or Windows, this will be as easy as simply double-clicking the .zip file.

Step 2: Set Up Your Sound

Now that your library is in the correct format, load it and adjust the parameters to your liking. This could include changes to the envelope, filter settings, effects, or any other adjustable parameters within the library.

Step 3: Access the FILE… Menu

Once you’re happy with your sound, look for the FILE… menu. This is typically located at the top of the DecentSampler interface.

Step 4: Choose “Developers Tools > Save Preset…”

In the preset menu, you should see an option to “Save Preset…”. Click on this option.

Step 5: Select Save Location and Name Your Preset

A dialog box will appear, prompting you to save your preset. It is important that you save the preset in the same location as the other presets for this library – DecentSampler will usually suggest the correct location as the default location. Choose a name that’s descriptive and easy to remember. For example, “Warm Pad with Long Release” or “Punchy Bass with Distortion”.

Step 6: Confirm and Save

Once you’ve named your preset, click “Save” or “OK” to confirm. Your preset is now saved and ready for future use!

Accessing Your Saved Presets

To use your saved preset in the future:

  1. Load the same library you used when creating the preset (remember, it must be the .dsbundle or folder-based version).
  2. A box will pop up showing you all of the presets that belong to that library. 
  3. Find and select your new saved preset.

Remember, user presets are specific to the library you’re using. A preset saved while using one library won’t be available when you’re working with a different library.

Happy sampling, and enjoy the convenience of your personalized DecentSampler presets!

Posted on Leave a comment

Sample Creators: Here’s how to use the new XY Pad UI control

Hello! Version 1.11.12 of Decent Sampler introduces a useful new UI control: an XY pad. Here’s an example that I’ve colored yellow:

A screenshot of an XY Pad

This control is similar to a knob or a slider except that it works in two dimensions. For sample library creators who have worked with knobs and sliders will find that setting up this new control is pretty similar to those controls. The main difference between an XY pad and a knob is that instead of having one set of bindings it has two: one for the X axis and one for the Y axis. The code for the example above is this:

<xyPad x="10" y="10" width="300" height="195" parameterName="Pad" xValue="0.5576778054237366" yValue="0.4821614623069763" bgColor="77FFCC00" markerFillColor="FFFFFFFF" outlineColor="77FFFFFFF">
        <x>
          <binding type="amp" level="group" groupIndex="0" parameter="AMP_VOLUME" translation="linear" translationOutputMin="0" translationOutputMax="1"/>
          <binding type="amp" level="group" groupIndex="1" parameter="AMP_VOLUME" translation="linear" translationOutputMin="1" translationOutputMax="0"/>
        </x>
        <y>
          <binding type="effect" level="instrument" effectIndex="0" parameter="FX_FILTER_FREQUENCY" translation="table" translationTable="0,33;0.3,150;0.4,450;0.5,1100;0.7,4100;0.9,11000;1.0001,22000"/>
        </y>
      </xyPad>
Code language: HTML, XML (xml)

You’ll note that the current value on the X axis can be found in the xValue attribute, and the current value for the Y axis can be found in the yValue attribute. XY Pads are automatable using DAW automation.

To learn more about this control, see the updated documentation here. You can download this example here – you’ll find it in the example 9 directory.

Enjoy!

– Dave

Posted on Leave a comment

Sample Creators: Introducing Note Sequences

Hello Sample Creators!

I have a couple of news items I wanted to share. First, I’m thrilled to announce a new update to Decent Sampler – a tiny but mighty sequence playback engine hidden right within the plugin. This new feature lets you embed simple note sequences directly into your sample libraries. This opens up a world of possibilities for sample library makers. For example:

  • Guitar libraries: Strumming patterns, arpeggios, and riffs
  • Drum libraries: Provide essential preset beats and fills to jumpstart users’ creative flow.
  • Melodic libraries: Craft short phrases or even full melodic sequences.
  • World percussion libraries: Embed traditional rhythms and grooves to enhance authenticity.

Learn more about how to use these here. By the way, for those of you who are Patrons, the latest version of the Omnichord sample library makes use of the new sequencer functionality. Each of the Omnichord strums is a little 13 note sequences that gets played when the user hits a key.

Which brings us to our second news item: the DecentSamples File Format Developer Guide has been moved here. As I was typing up documentation for the note sequencer stuff, I felt we’d finally reached the moment where we needed to break all of the information in the guide into several discreet pages. I’m now using ReadTheDocs service to help me host and organize the documentation.

OK. I think that’s it. As always, let me know if you find any bugs.

– Dave

Posted on 3 Comments

For Sample Creators: How to Add Tempo-Synced Delay to your Instruments

Up until now, the Delay effect has allowed users to specify the amount of delay in seconds. A brand new feature in version 1.10.0 of Decent Sampler adds the possibility of syncing the delay time to the host clock, and allowing users to specify their delay time in musical time units (eg. quarter notes, eighth notes, etc.). In this article, we’ll talk about how to make use of this new functionality.

1. Getting Started

The patch we are going to be working with is just a basic triangle wave sample library. This is what the code looks like:

<?xml version="1.0" encoding="UTF-8"?>

<DecentSampler>
  <ui>
    <tab></tab>
  </ui>
  <effects></effects>
  <groups attack="0.0" decay="1.0" sustain="0.0" release="1.75" ampVelTrack="0.3">
    <! -- sample definitions are here -->
  </groups>
</DecentSampler>

Code language: HTML, XML (xml)

(For the sake of brevity, I’ve removed the portions of the code listings that contain the sample definitions, as they are not important for this tutorial.) As you can see, the UI is blank and there are no effects added yet. By the way, if you wish to follow along, this starting code can be found here in the file labeled Step 1.

2. Adding the Basic Delay Effect

Our first order of business is to add in the delay effect as well as some knobs to control it. Here how that looks:

<?xml version="1.0" encoding="UTF-8"?>

<DecentSampler>
  <ui>
    <tab>
      <labeled-knob x="180" y="40" label="Delay Time" valueType="float" minValue="0" maxValue="5" value="0.5">
        <binding type="effect" level="instrument" position="0" parameter="FX_DELAY_TIME" translation="linear"/>
      </labeled-knob>
      <labeled-knob x="280" y="40" label="Feedback" valueType="float" minValue="0" maxValue="1" value="0.5">
        <binding type="effect" level="instrument" position="0" parameter="FX_FEEDBACK" translation="linear"/>
      </labeled-knob>
      <labeled-knob x="380" y="40" label="Stereo Offset" valueType="float" minValue="0" maxValue="1" value="0.01">
        <binding type="effect" level="instrument" position="1" parameter="FX_STEREO_OFFSET" translation="linear"/>
      </labeled-knob>
      <labeled-knob x="480" y="40" label="Wet Level" valueType="float" minValue="0" maxValue="1" value="1">
        <binding type="effect" level="instrument" position="0" parameter="FX_WET_LEVEL" translation="linear"/>
      </labeled-knob>
    </tab>
  </ui>
  <effects>
    <effect type="delay" delayTime="0.5" stereoOffset="0.01" feedback="0.2" wetLevel="0.5" />
  </effects>
  <groups attack="0.0" decay="1.0" sustain="0.0" release="1.75" ampVelTrack="0.3">
    <! -- sample definitions are here -->
  </groups>
</DecentSampler>
Code language: HTML, XML (xml)

As you can see, we’ve added our delay in on line 21. In lines 6 through 17, we’ve added in some controls that let us fine-tune various aspects of our delay effect. In this article, we’re going to be focusing almost exclusively on that first control: Delay Time. Right now, the delay effect is receiving information about how long the delay should be from that first control in seconds. The control has a valueType of float, which stands for “floating-point number”, which is the default valueType. This basically means that the number that control is going to output will be anything between the minimum and the maximum. In other words, it could be a whole number, it could be fractional, float means that pretty much anything goes.

(If you wish to see this iteration of the code, it can be found here in the file labeled Step 2.)

3. Adding in tempo syncing

Up until now, we’ve been specifying our time in seconds, and, even if the plugin is being run within some host software, the delay time is not being synced to the tempo of that software at all. Let’s change that. Here’s what the new code looks like:

<?xml version="1.0" encoding="UTF-8"?>

<DecentSampler>
  <ui>
    <tab>
      <labeled-knob x="180" y="40" label="Delay Time" valueType="musical_time" value="10">
        <binding type="effect" level="instrument" position="0" parameter="FX_DELAY_TIME"/>
      </labeled-knob>
      <!-- more knob definitions we don't care about right now -->
    </tab>
  </ui>
  <effects>
    <effect type="delay" delayTimeFormat="musical_time" delayTime="0.5" stereoOffset="0.01" feedback="0.2" wetLevel="0.5" />
  </effects>
  <groups attack="0.0" decay="1.0" sustain="0.0" release="1.75" ampVelTrack="0.3">
    <! -- sample definitions are here -->
  </groups>
</DecentSampler>
Code language: HTML, XML (xml)

There are two important things to note here:

First, on line 6, we’ve changed the valueType of our Delay Time knob to musical_time. This is a special, magic value that will cause the control to display a series of standard musical time increments. For those curious, here are the actual time increments that will be used: 1/64 triplet, 1/64, 1/32 triplet, 1/64 dotted, 1/32, 1/16 triplet, 1/32 dotted, 1/16, 1/8 triplet, 1/16 dotted, 1/8, 1/4 triplet, 1/8 dotted, 1/4, 1/2 triplet, 1/4 dotted, 1/2, 1 triplet, 1/2 dotted, 1, 1/1 dotted. On the back end, this will be transmitted out to the delay effect as a whole number from 0 to 20.

Of course, our delay effect was set to expect its time in seconds, right? So if we were to leave the Delay effect alone, it would misinterpret that special magic number coming from the knob as a value in seconds. To fix this, we’ve added a brand new delayTimeFormat="musical_time" attribute to the <effect> element on line 13. Now, the Delay effect knows that its time is being set using the special magic array of musical time options. For example, if it receives a value of 4 from a binding, it no knows that that does not mean 0 seconds, it means 1/32 note relative to whatever the host tempo is.

By the way, if you wish to see this iteration of the code, it can be found here in the file labeled Step 3. It already works really nicely.

4. Adding a knob that allows the user to switch between Seconds and Musical Time

So you may be wondering what happens if the plug-in is being run in standalone mode. Well, in such a situation, DecentSampler isn’t able to receive a tempo from the host software, so it defaults to 120 beats per minute. Because of this scenario, it is often wise to include a button that lets users switch between musical time and clock time. Here’s how we do that:

<?xml version="1.0" encoding="UTF-8"?>

<DecentSampler>
  <ui>
    <tab>
      <label x="101" y="57" width="80" height="30" text="Tempo Sync" textSize="15" />
      <button x="101" y="90" width="80" height="30" value="0">
        <state name="On">
          <binding type="effect" level="instrument" position="0" parameter="FX_DELAY_TIME_FORMAT" translation="fixed_value" translationValue="musical_time" />
          <binding type="control" level="ui" position="2" parameter="VALUE_TYPE" translation="fixed_value" translationValue="musical_time" />
          <binding type="control" level="ui" position="2" parameter="VALUE" translation="fixed_value" translationValue="10" />
        </option>
        <state name="Off">
          <binding type="effect" level="instrument" position="0" parameter="FX_DELAY_TIME_FORMAT" translation="fixed_value" translationValue="seconds" />
          <binding type="control" level="ui" position="2" parameter="VALUE_TYPE" translation="fixed_value" translationValue="float" />
          <binding type="control" level="ui" position="2" parameter="VALUE" translation="fixed_value" translationValue="0.25" />
          <binding type="control" level="ui" position="2" parameter="MIN_VALUE" translation="fixed_value" translationValue="0" />
          <binding type="control" level="ui" position="2" parameter="MAX_VALUE" translation="fixed_value" translationValue="5" />
        </option>
      </button>
      <labeled-knob x="180" y="40" label="Delay Time" valueType="musical_time" value="10">
        <binding type="effect" level="instrument" position="0" parameter="FX_DELAY_TIME"/>
      </labeled-knob>
      <!-- a bunch of controls we don't care about right now -->
    </tab>
  </ui>
  <effects>
    <effect type="delay" delayTimeFormat="musical_time" delayTime="0.5" stereoOffset="0.01" feedback="0.2" wetLevel="0.5" />
  </effects>
  <groups attack="0.0" decay="1.0" sustain="0.0" release="1.750873208045959" ampVelTrack="0.3">
    <groups attack="0.0" decay="1.0" sustain="0.0" release="1.75" ampVelTrack="0.3">
    <! -- sample definitions are here -->
  </groups>
</DecentSampler>

Code language: HTML, XML (xml)

Woah, there’s a lot here! Let’s walk through it line by line: On line 6, we’ve added is a label. This is purely for descriptive purposes. Next, we’ve got a button with two states. Each state has a number of different bindings as each time the state gets changed, we are not only going to be changing effect’s settings, but also the settings for the Delay Time knob. Here is what is happening in each of the two states:

In the “On” state, on line 9, we change the delayTimeFormat setting to musical_time for the Delay effect. After that, on line 10, we set the valueType to musical_time for our Delay Time knob (which has an index of 2). Finally, one line 11, we set a value so that when the user switches states, the control doesn’t get set to some random value. In this case, I’ve decided to set it to 10, which corresponds to eighth notes in the magical musical_time numbering system.

Moving on, let’s look at the “Off” state. The first thing we do when time sync is switched off is, on line 14, we change the delayTimeFormat setting to seconds for the Delay effect. After that, on line 15, we set the valueType to float for our Delay Time knob. Next, on line 16, we set a value so that when the user switches states, the control doesn’t get set to some random value. In this case, I’ve decided to set it to 0.25 seconds, which corresponds to eighth notes if the tempo were 120BPM. This was arbitrary decision on my part, but it seems to sound nice. Last but not least, on lines 17 and 18, we set minimum and maximum values for our control. We do this because before, when our control was in musical_time mode, its minimum and maximum values are automatically set to 0 and 20, respectively in order to accommodate the musical time system. We now need to reset them to plausible limits.

This final version of the code can be found here in the labeled Step 4.

Conclusion

I know this last case seems like a lot of code, and it may, at first, be a bit confusing. The good news is that for the most part you can just copy and paste the code above into your projects. Just make sure you change those pesky position values within the bindings, so that the bindings actual point to the controls and effects you want to change. 😉

Enjoy!

– Dave

Posted on Leave a comment

For Sample Creators: Changing Sample Start, End, and Loop Points using GUI controls

I have added a few things to the sampler in version 1.9.18:

  1. There’s experimental support for FLAC files.
  2. It’s now possible to assign knobs to the start and end point of samples, as well as their loop points.
  3. It’s now possible to dictate the playback engine that is used by a sample library.

Now, the first item above is probably pretty self-explanatory, this blog post is going to concern itself with items 2 and 3.

How To Manipulate Start, End, and Loop Points

To change a sample’s start, end, loop start, or loop end, simply use the SAMPLE_START, SAMPLE_END, LOOP_START, and LOOP_END parameter names, respectively. Here is some sample code:

<labeled-knob x="445" y="75" width="90" textSize="16" textColor="AA000000" 
                    trackForegroundColor="CC000000" trackBackgroundColor="66999999" 
                    label="Start" type="integer" minValue="0" maxValue="24000" value="0" >
        <binding type="general" level="group" position="0" parameter="SAMPLE_START" />
      </labeled-knob>
      <labeled-knob x="515" y="75" width="90" textSize="16" textColor="AA000000" 
                    trackForegroundColor="CC000000" trackBackgroundColor="66999999" 
                    label="End" type="float" minValue="0.0" maxValue="24000" value="24000" >
        <binding type="general" level="group" position="0" parameter="SAMPLE_END" />
      </labeled-knob>
      <labeled-knob x="585" y="75" width="90" textSize="16" textColor="AA000000" 
                    trackForegroundColor="CC000000" trackBackgroundColor="66999999" 
                    label="Loop Start" type="float" minValue="0.0" maxValue="24000" value="0" >
        <binding type="general" level="group" position="0" parameter="LOOP_START" />
      </labeled-knob>
      <labeled-knob x="655" y="75" width="90" textSize="16" textColor="FF000000"
                    trackForegroundColor="CC000000" trackBackgroundColor="66999999"
                    label="Loop End" type="float" minValue="0" maxValue="24000" value="24000">
        <binding type="general" level="group" position="0" parameter="LOOP_END" />
      </labeled-knob>
Code language: HTML, XML (xml)

In order for this to work properly the sample playback engine must be in RAM/Memory mode (not disk streaming), otherwise you will get very unpredictable results. In order to enforce this, sample creators should use the new playbackMode attribute, which is explained in the next section…

Playback Engines

As you may know, there are two playback modes: the memory mode stores a samples in memory, whereas the disk streaming mode caches only the beginning of each sample, and then uses a series of threads to grab data as needed. Because the memory mode has all of the data it could possible need in its memory already, it is far more flexible in terms of what can be accomplished with it, but, since it loads the entire sample into memory, it can also use up a lot of RAM for large sample libraries. Currently, users can change their playback mode by going into the preferences screen and choosing a new Sample Engine Mode:

97% of the time, this is exactly what you want: the user choosing their own playback system. The problem is that some sample libraries work much better with one mode vs the other. If the sample library has knobs bound to start, end, loopStart, or loopEnd, then being in RAM mode is actually required. Of course, no sample creator wants to have to tell their users “Oh, by the way, make sure you switch playback modes in the preferences before you use my new sample library.” The solution is the playbackMode attribute. It has three possible modes: memory, disk_streaming and auto(default). When a value of memory is used, the sample will be played back using the memory mode as though the user had that playbackEngine selected in the preferences.

OK. I think that’s it. Enjoy!

– Dave

Posted on Leave a comment

Q: Is it possible to extract the samples contained within Decent Sampler instruments?

Occasionally, users will reach out and ask me whether it’s possible to extract the samples contained in a Decent Sampler library. One common use-case for this is users who want to use the samples with a hardware sampler such as an MPC or an SP-404. Anyway, the answer to the question is that in some cases it’s possible and in others it is not.

Me: “Are you sure you really want to do this?”

Before we go into the details of when it’s possible, it’s worth mentioning that a Decent Sampler instrument is usually much more than just a collection of samples: a creator of a library will often have made use of creative layering techniques as well as onboard effects, both of which play a huge part in producing the distinctive sound of a library. This means that the only reliable way of getting the intended sound of a library is to actually use the output from DecentSampler as your sound. This doesn’t mean that you are out of luck if you want to use these sounds with a hardware sampler. You can always load DecentSampler up in your DAW of choice, play a bunch of long notes, and then export the audio out from that session. This will often yield better sound than if you were to just go directly into the sample library and grab the underlying samples.

You: “OK, but I still want to do it!”

So, assuming that you really do want to grab the underlying audio files, here’s what you need to know. First, if the sample library is a commercial release and copy-protected then you are out of luck: the underlying wave files will all encrypted and the only thing that can decrypt them is the DecentSampler plugin itself. In such cases, the only thing that you can do is go into your favorite DAW, play any notes you might want to have as audio files, and export out the audio from that DAW session. This is always my preferred way of operating anyway.

If the library is not copy protected, then you should definitely be able to get at the underlying samples. In fact, it’s pretty easy. There are two formats that DecentSampler libraries come in:

  1. If you are presented with a .dsbundle file, this is really just a directory. If you are on Windows or Linux, you should be able to just look inside that directory and find the sample files. If you are on Mac, this file will show up as a “package.” To get access to it, find the file in the Finder, hold down the Control key, and then click on the file: a context menu will pop up, from which you should select Show Package Contents. From this point on, the .dsbundle file will be presented to you just like any other folder…and somewhere in that folder you will find the raw audio files. The exact location will be different for every library.
  2. If you are presented with a .dslibrary file, then you will need to decompress it. In reality, .dslibrary files are simply .zip files, and if you change their extension from .dslibrary to .zip you should be able to decompress the library just as you would any other .zip file. Within the directory structure that gets created, you should be able to find a folder that contains your samples.

That’s it! Hope this was helpful.

– Dave

Posted on Leave a comment

For Sample Creators: General Advice on Making Sample Libraries Based on Real-World Instruments

Hello Samplists,

Here’s a list of general advice for people making sample libraries based on real-world instruments. All of this advice falls squarely into the “give advice that you yourself need to hear” category. I should also mention that this is an intermediate-level post that assumes that you already know that basics of how to make a sample library.

1. Don’t get hung up on capturing the “authentic” sound of an instrument

Think carefully about your actual goal when making a sampled instrument. When I first started, I approached the work of making sample libraries as though I was an archivist trying to preserve the “authentic” sound of a real world instrument for posterity. This is a noble goal, but it doesn’t necessarily yield the best sampled instruments. I quickly realized a much better goal was trying to make virtual instruments that are fun to play, sound good, and useful to composers or producers. And yes, sometimes these two goals are at odds with each other. 

For example, when you record a piano, you may discover that some notes sound great and others sound lousy. If you are trying to be accurate, you may think you should include those lousy notes in the same, because, after all, they also represent how the instrument truly sounds. Of course, this is a valid perspective. I would argue that you should leave them out, or at very least, provide a version with a curated selection of “good” notes. The vast majority of composers and producers would rather have something that just sounds good immediately, that they don’t have to wrestle a good sound out of.

Another important thing to realize is that samplists are never getting the “true” sound of an instrument anyway. When it comes to acoustic instruments, even something as basic as where you put your microphone can drastically change the way an instrument sounds. In other words, even someone trying to capture the authentic nature of instrument is still making creative and aesthetic decisions. So give that you’re already inserting yourself into the process at the recording stage, why not continue making aesthetic decisions at every point in the process. If you record a violin sample, and it sounds harsh and grating, by all means EQ it until it sounds good! If it sounds to dry, add some reverb.

I’ve made the mistake several times of faithfully re-creating, an instrument sound, only to find that for whatever reason that sound didn’t actually work as a sample library. It’s been helpful for me to think of the source sound as the departure point on which I’m building a brand new Instrument – a virtual Instrument – that will be most likely be triggered using a piano keyboard.

2. You don’t need nearly the number of samples you think you do. 

When most people are getting started, they see sample libraries releases by big sample library companies boasting about how many samples are included in a release and they will naturally think that they also need to record every note of an instrument with five different velocities and sometimes even round robins. I’m here to tell you that 9 times out of 10 this is not necessary. Most users would rather save the hard disk space. Most melodic instruments you can have a zone every 3 to 6 notes — sometimes even just one zone per octave – and it will sound every bit as good. 

As you get more experienced, you will discover which instruments require more samples and which can do without. For example, one exception is when there is any sort of modulation like tremolo, vibrato or an LFO filter on a synth. If you try to pitch bend samples that have these sorts of fast, time-based modulation, you will end up with different rates of modulation depending on which note you play, which may sound terrible. In other words, use your aesthetic judgement.

3. Always pitch-bend down

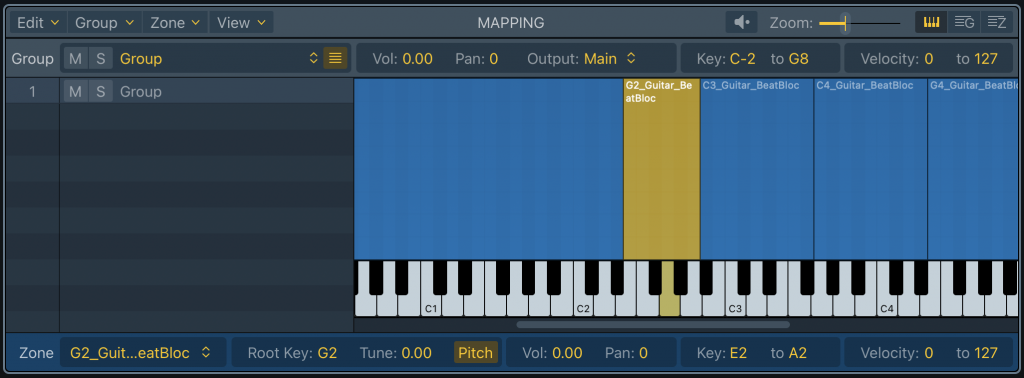
If have not recorded a sample for every note, you may need to set up mapping so that pitch-bending takes place. Often, when you map samples in a sample-mapping product (such as Logic Sampler or Kontakt), the mapper will want to put the root note in the middle of a zone, meaning that if you play a play a note above the root note, it will pitchblende the note up. For example:

A screenshot of the Logic sampler's default mapping.

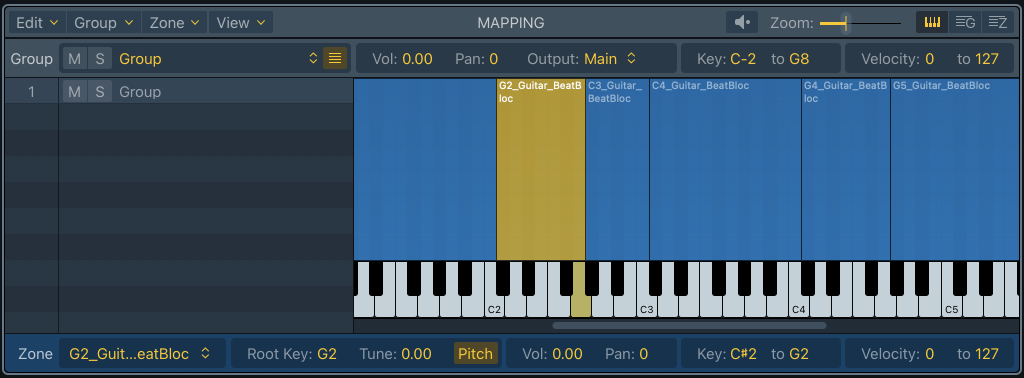
Here’s the thing: samples that are pitch-bent down almost always sound better than samples that are pitch bent up. This is because when you pitch-bend samples down, you remove some of the higher frequencies, which at worst just sounds a bit like a nice low-pass filter. On the other hand, when you pitch-bend a sample up, you are actually adding high frequencies, which can sound weird and “chipmunky.”

The solution is to always map your samples with the root note at the top of the range. To continue our example from above, you would get something that looks like this:

A more desirably sample mapping

4. How to know when your instrument is done and ready to release

This is easy. Your sample is done when you can’t stop playing with it. When every time you open it up the library, you get distracted and start writing music. You are your own first customer, so be honest with yourself. If your own reaction to playing with a library is a tepid “I guess this is good?” then there’s something wrong. Figure out what’s bothering you about the sounds and fix them.

Hope this little list has been helpful. As I think of more things, I will go back and update this document as more things occur to me.

All the best,
Dave

Posted on 13 Comments

Microtuning Support for Decent Sampler

A çifteli (musical instrument) from Kosovo.

Over the past few months, several people have asked me if I could add microtuning support to Decent Sampler. This week, after purchasing a çifteli (pictured above) at a local thrift shop and discovering its unique scale, I finally decided to roll up my sleeves and see what I could do.

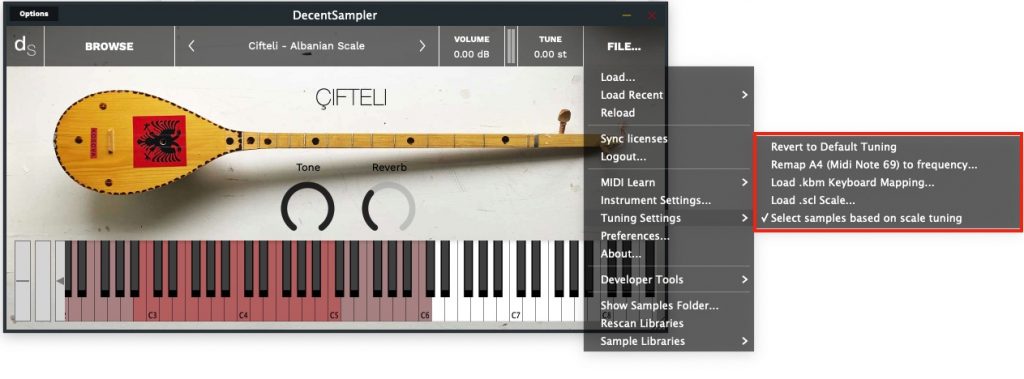
There is a new version (1.8.0) of Decent Sampler available here. It will be officially released on Monday, February 27th. This new version introduces the Tuning menu. This menu allows you load Scala (.scl) and Keyboard Mapping (.kbm files). It also allows you to specify a non-440Hz frequency for MIDI Note 69:

The new Tuning sub-menu

In order to use the microtuning functionality, you will need to get ahold of the .scl and .kbm files for the scale you are interested in. A great place to download a bunch of scales is here (look for the Download them all link in the Tuning Files section). Once you have those, you can load them using the Load .kbm Keyoard Mapping… and/or the Load.scl Scale… menu options.

When you specify a scale or keyboard mapping, your scale and keyboard mapping will get saved along with the DAW session. However, if you create a new track and put Decent Sampler on that track, the new track will revert back to the classic twelve-tone scale that most DS users expect. This is by design, but if someone thinks this behavior should be changed, let me know.

Sample creators can also embed scales in their instruments by adding a “tuningSclFile” and/or “tuningKbmFile” attributes to their top-level <DecentSampler> elements.

I want to thank the kind developers over at Surge synth for making their microtuning library available to all developers and for licensing it so generously. Without this, I would not have added microtuning support.

This is very much my first foray into the world of microtuning, so I expect that users will have suggestions. There will doubtless be a version 1.8.1 and a version 1.8.2. Let me know what you think!

– Dave

EDIT: I’ve updated the screenshot above to show the new version of the Tuning menu.

Posted on 4 Comments

What’s the deal with the File Browser tab in Decent Sampler?

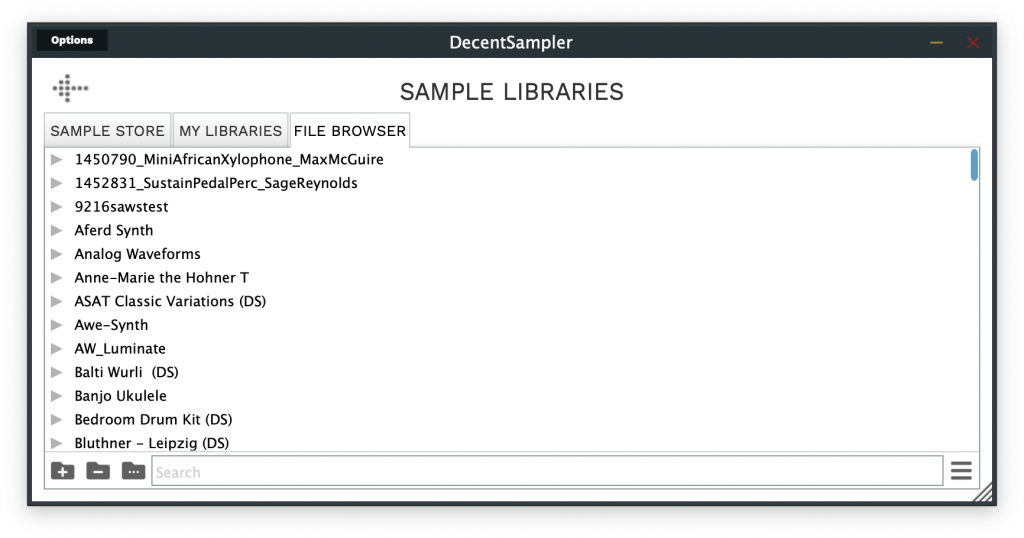
So, the latest version of Decent Sampler (1.7.6) has a new tab within the BROWSE screen called File Browser:

The Decent Sampler File Browser tab
The Decent Sampler “File Browser” tab

This looks and functions almost exactly like the My Libraries tab. In fact, I’m hoping that we will be able to get rid of the My Libraries tab in favor of the File Browser soon, and when that happens I will probably just rename File Browser back to My Libraries and new users won’t know the difference. Both the File Browser and the old My Libraries aim to allow users to manage and load sample libraries from their own personal collections, but there are important differences in the way the two tabs work which is why I’m writing this post.

What the My Libraries tab was meant to be and where it fell short

Under the hood, Decent Sampler maintains a small, lightweight database that contains the locations of all of the sample libraries in a user’s personal collection. The plan was originally that the My Libraries tab would be used to manage this database. Every time a user loaded a Decent Sampler library, it would be added to the database, and from that point on it could be managed within the My Libraries tab. The My Libraries tab even offered the possibility of creating virtual folders to help with organizing sample libraries. This seemed like a great solution until I tried to use it for an extended period of time (I’m not only the creator of Decent Sampler, I’m also an avid user).

For desktop users, it is much easier to manage a folder containing many sample libraries using the tools provided by your operating system. Users (including me) would rename sample libraries on disk, delete them, or move them into folders that made logical sense. In such situations, the result would be that the reality as reflected in the database was often be different than what was on disk, and it was often difficult or even impossible to sync them up. To make matters more complicated, iOS users didn’t have the option of using the OS to manage their files well because, due to iOS limitations, all of their DecentSampler libraries are stored in a siloed file container called an AppGroup. Since the AppGroup is not accessible by the iOS Files app, users literally had no way of managing their files other than my using the My Libraries tab, which meant that if something went wrong with the internal database, they would be completely in the dark and stuck with useless files that were using up their precious device storage.

The Solution: The new File Browser tab

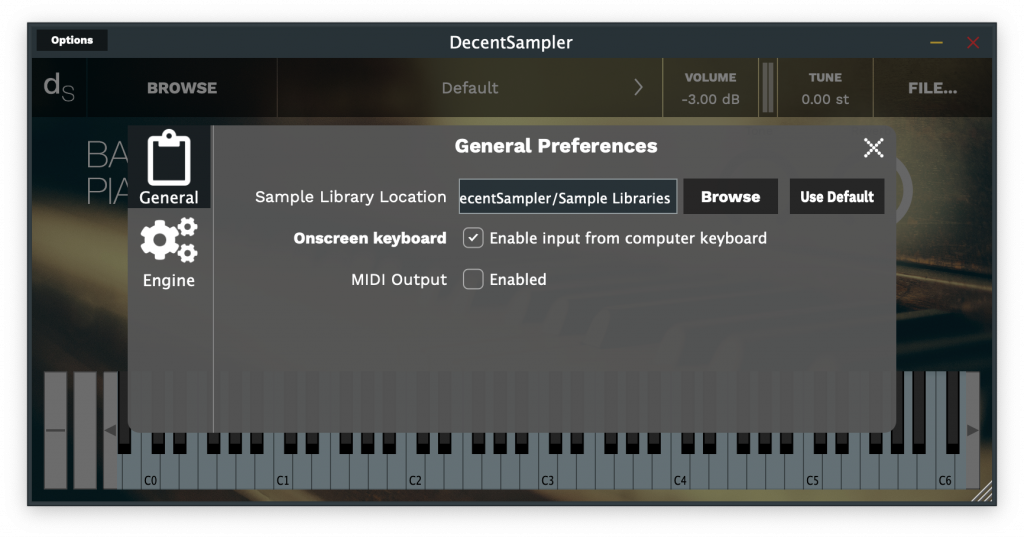
The new File Browser tab offers an accurate picture of whatever is stored in your Sample Libraries folder. For desktop users, this is the folder that you specified when you first launched the app, or that you chose in the Preferences dialog box. If you’re not sure where your Sample Libraries directory is, you can check its location by going to the Preferences dialog box and looking at the Sample Library Location entry (this option is not available on iOS):

Choosing a new sample library location in the General Preferences dialog box

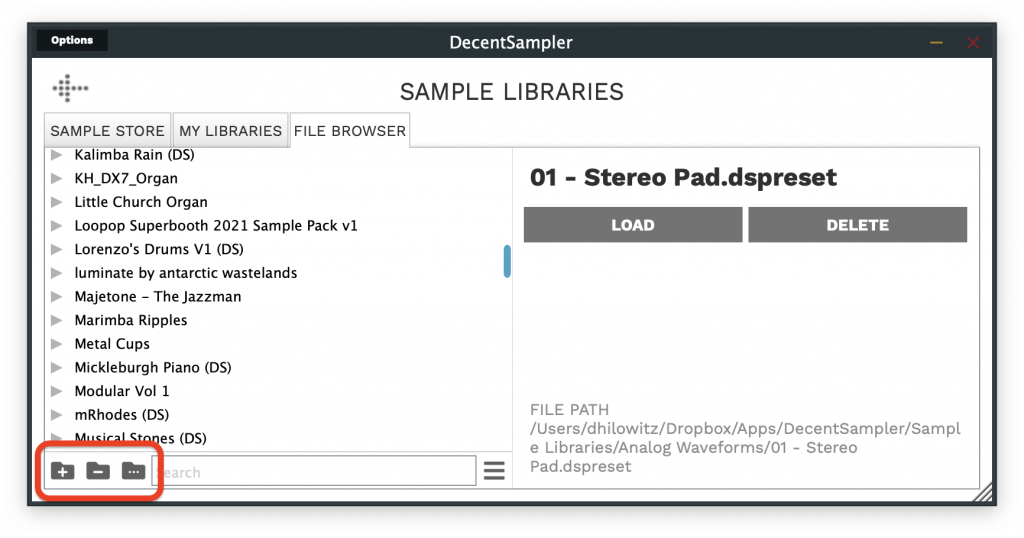
As mentioned earlier, the new File Browser tab aims to provide an accurate list of the folders and files as they exist on disk. In the bottom left-hand corner are three icons which allows you to create, rename, and delete folders.

The add, remove, and rename folder buttons

Unlike the folders that are created in the My Libraries tab, the folders in the File Browser are real folders that exist on disk. Be careful, if you delete a folder containing a bunch of sample libraries, the sample libraries contained with will be deleted as well (just like they would be on your operating system).

This view is very much a work in progress. (For example, at the time of writing, the search functionality is very slow on the file browser tab because every time it performs a search, it goes through the entire tree. This will be fixed in upcoming versions.) I wanted nonetheless to share the work in progress to let you all know the direction I’m hoping to take, as well as to get feedback from users and developers.

Enjoy!
– Dave